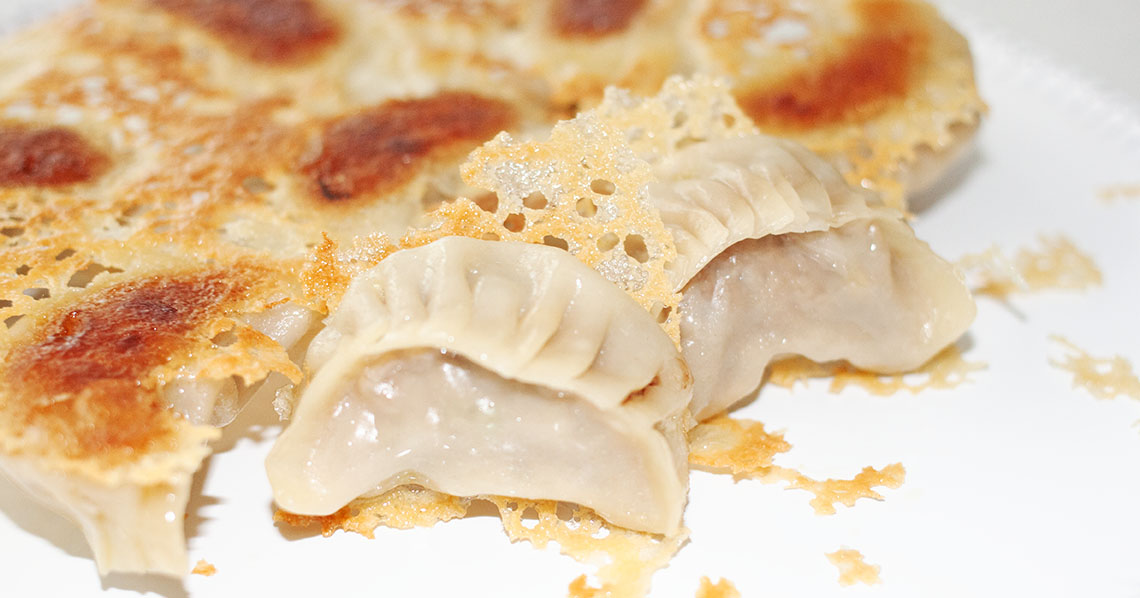
Turn your volume up — this crunch sound is not a sound effect. One homemade dumpling recipe. Fried, steamed, or in soup. Your freezer stash, your rules. Shatteringly crisp lacy skirt meets impossibly juicy filling that literally explodes in your mouth.
Wanna bite? 🍴 There’s a sound that haunts every dumpling lover’s dreams. It’s not just the sizzle of hot oil — it’s that distinctive crack when chopsticks meet perfect crispy lace, followed by the stunned silence before the first bite. And then? The explosion of juice that makes people gasp and reach for their phones.
Crispy dumpling skirt has absolutely dominated social media, and for good reason. That viral golden lace isn’t just Instagram-worthy — it’s the perfect solution to the eternal dumpling dilemma: how do you get restaurant-quality texture at home? The answer lies in understanding both the science of the slurry and the ancient Korean technique that creates filling so juicy it defies physics.
I learned the real secret watching my cookbooks — “Water goes slowly.” — “The meat must drink it properly.” Add warm water in small portions, always stirring clockwise, until the mixture transformed from ordinary ground meat into something that looked almost like pale mousse.
That technique — 60 – 70 °C water incorporated gradually while kneading in one direction — is what separates viral dumpling videos from the dumplings that actually make people close their eyes in satisfaction. It’s chef’s wisdom meeting food science: at exactly 60 -70 °C, water is warm enough to relax meat proteins without cooking them, and the directional kneading creates a network that traps moisture like a sponge traps water.
This crispy skirt dumpling recipe carries generations of Korean technique wrapped in the viral moment everyone’s chasing. The salted, aggressively squeezed cabbage provides crunch without water interference. The aromatics build umami layers that complement, never compete. The slow water incorporation creates that signature bouncy, almost custard-like texture that makes juice literally shoot out when you bite down.
I make these when I need to feed people something that looks like I spent all day in the kitchen but actually comes together in 30 minutes of focused technique. When I want something that invites participation — dumpling folding parties are pure Jeong (정) — but guarantees restaurant results. When I remember that the best viral trends are actually ancient wisdom finally getting the recognition it always deserved.
One of the best ways to care for the people I love is to feed them.
And dumplings are one of my favorite ways to do that — comforting to share, practical to freeze, and always worth making in a big batch.
The effort is nearly the same whether you make 50 or 200: prepare the filling, set up your station, fold, cook, clean. But what you get in return over the next few months is something hard to measure.
Yes, this crispy-skirt dumpling technique gives you that beautiful golden lace everyone wants to photograph. But the real beauty is what comes after: freezer bags filled and ready, waiting for the nights when dinner feels impossible.
It’s a small act of care for your future self.
A gentle backup plan.
Something delicious, homemade, and full of love — even on the tired days.
B’s Secret
The 60°C Hydro-Emulsion That Survives Freezing: Here’s what separates “pretty good homemade dumplings” from “I’ll never buy frozen again” perfection. Heat water to exactly 60°C (140°F) and add it to your meat mixture in 5-6 separate portions, kneading vigorously in one direction only between each addition.
Why this creates juice explosion: At 60°C, water is warm enough to relax meat proteins and encourage absorption without beginning to cook. The directional kneading aligns protein strands like tiny ropes, creating a network that traps seasoned liquid inside like a natural soup dumpling. Most importantly, this structure survives freezing beautifully — dumplings actually taste better after a month in the freezer as flavors meld and proteins relax further.
The transformation you’ll see: Loose ground meat becomes pale, sticky, almost mousse-like. Press with your finger — it should bounce back slowly. Your hand should feel tired from vigorous kneading. This exhaustion is your investment in three months of dumpling joy.
This Did It!
Technique Tip:
- The batch-cooking mindset shift: Making 200 takes only 20-30 minutes longer than making 50. The real time investment is prep and cleanup, which stays constant. Think of it as cooking once, eating 40 times.
- Flash freeze is non-negotiable: Arrange dumplings on parchment-lined trays so they don’t touch. Freeze 2-3 hours until rock solid, then transfer to zipper bags. Skip this step and you’ll have one giant dumpling mass.
- The squeeze test for cabbage: You need about 320g from 500g starting weight. Squeeze in handfuls until your forearms burn slightly. Under-squeezed cabbage releases water during freezing, creating ice crystals that ruin texture.
Ingredient Swaps
- Meat ratio flexibility: 540g beef + 1.4kg pork is my preferred blend (beef adds depth, pork adds juiciness). All pork works beautifully. 50/50 pork-chicken needs extra sesame oil for richness.
- Budget optimization: Ground pork shoulder has ideal fat content and costs less. Buy in bulk when on sale, portion, and freeze until dumpling day.
- Wrapper sourcing: Buy 200-count packages from Asian grocery stores (much cheaper than small packs).
4 Cooking Methods Mastered
METHOD 1: Viral Crispy Skirt (Weekend Luxury)
- Frozen dumplings → pan with oil → 3-4 min golden bottoms → pour slurry → cover 7-8 min → uncover 2-3 min crispy
- When: Weekend brunch, dinner parties, Instagram content
METHOD 2: Steamed (Gentle Weeknight Comfort)
- Frozen dumplings → steamer basket → 12-15 minutes until translucent
- When: Weeknight dinners, clean flavors, healthiest option
METHOD 3: Dumpling Soup (Ultimate Healing)
- Boiling broth → add frozen dumplings → return to boil → add cold water → boil again → 10 min total
- When: Sick days, cold weather, complete meal in 10 minutes
METHOD 4: Air Fried (Crispy Snacking)
- Frozen dumplings + light oil → 180°C for 8-10 min, flip halfway
- When: Snacks, drinking food, less oil than pan-frying
FAQS
Q: Does the 60°C technique work for frozen dumplings? Absolutely crucial. The hydro-emulsion survives freezing beautifully — dumplings actually taste better after weeks frozen as flavors meld. This is why grandmother’s frozen dumplings were legendary.
Q: How long does making 200 actually take? Filling prep: 30 min. Folding: 60-90 mins. Cleanup: 15 min.
NUTRITION FACTS (per serving, 10 dumplings)
- Calories: 420 kcal
- Protein: 22 g
- Fat: 24 g
- Carbs: 30 g


RELATED RECIPES | Quick and Easy Meals |🔗
Made this recipe? Tag @bommgachi with #BommgachiKitchen!
Share your creations, comment below, and subscribe to my newsletter for more recipes.
I make these when I need to feed people I love without spending all day in the kitchen, when I want something that invites participation and creates memories around the folding process, when I remember that the best viral trends are actually centuries-old techniques just waiting for the world to pay attention and understand their profound beauty.
I hope these dumplings bring that same joy to your table — the satisfying shatter of the skirt, the surprising explosion of the filling, the moment when everyone reaches for seconds without saying a word because their mouths are too busy being happy, too busy experiencing what happens when technique meets heart.
My kitchen, my calm.


Never Buy Frozen Dumplings Again — 60°C Water Secret + Viral Crispy Skirt (Make 200, Cook 4 Ways, Freeze 3 Months!
Description
I make these when I need to feed people I love without spending all day in the kitchen, when I want something that invites participation and creates memories around the folding process, when I remember that the best viral trends are actually centuries-old techniques just waiting for the world to pay attention and understand their profound beauty.
Ingredients
For Cabbage Preparation
For Assembly
Instructions
For Cabbage Preparation
-
Finely chop napa cabbage and toss with salt. Let sit 20 minutes. Squeeze aggressively until you have exactly 324g of dry, seasoned cabbage.
-
For Fillings
ombine all meat and seasonings. Add 60°C water in 5-6 separate portions, kneading vigorously clockwise for 90 seconds between each addition until mixture becomes pale, sticky, and bouncy.
-
Gently fold in squeezed cabbage, garlic, ginger juice, and scallions.
Assembly line meditation
-
Set up stations: filling, wrappers, water, trays. Place 1 tablespoon filling per wrapper, seal with water, pleat edges. Repeat 199 times (put on good music!).
-
Flash freeze for storage
Arrange on parchment-lined trays, freeze 2-3 hours until solid, then transfer to zipper bags. Keeps 3 months.
Nutrition Facts
Servings 10
- Amount Per Serving
- Calories 420kcal
- % Daily Value *
- Total Fat 24g37%
- Saturated Fat 8g40%
- Cholesterol 75mg25%
- Sodium 680mg29%
- Potassium 450mg13%
- Total Carbohydrate 30g10%
- Dietary Fiber 2g8%
- Sugars 2g
- Protein 22g44%
- Vitamin A 180 IU
- Vitamin C 6 mg
- Calcium 50 mg
- Iron 2.8 mg
- Vitamin D 12 IU
- Vitamin E 1.5 IU
* Percent Daily Values are based on a 2,000 calorie diet. Your daily value may be higher or lower depending on your calorie needs.